
Build your own tank stand
It may be a little time consuming, but it's really not too difficult. The following photographic record is of a tank stand I built recently for the garden and, with a few improvements, can be used as a model.
Getting started:
The stand has to be sized to fit the tank, so the first decision is the type of tank. I used an older galvanised iron one. Even when retired from it's original purpose, a galvanised iron tank can be repaired and reused. If in a very poor state, it can probably be plastered inside. An advert in a rural newspaper wanted column might be a good start. Yes, you might find a tank on Trademe as well!
One point to watch is that, here in NZ at least, a tank stand is a building. The fine print for exemption from a building consent is in the Building Act (Schedule 1, exempt building work):
(e) the construction of any tank or pool and any structural support of the tank or pool (except a swimming pool as defined in section 2 of the Fencing of Swimming Pools Act 1987), including any tank or pool that is part of any other building for which a building consent is required,—
(i) not exceeding 35 000 litres capacity and supported directly by the ground; or
(ii) not exceeding 2 000 litres capacity and supported not more than 2 metres above the supporting ground; or
(iii) not exceeding 500 litres capacity and supported not more than 4 metres above the supporting ground:
My tank is 400 gallons and the stand is under 2 metres high so is exempt from a consent (actually there are two of them, on separate stands...)
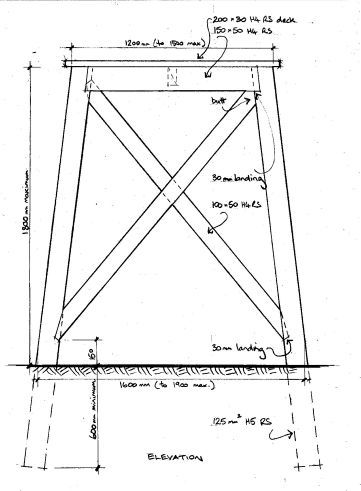
The tank is a little under 1200mm in diameter (the top and bottom are one piece without joins and the metal usually comes in 1200 or 4' wide strips), so the deck had to be slightly larger than this.
The legs are 2400 long and buried 600, giving a stand height of 1800. Of course if you're collecting roof water, the top of the tank needs to be a little below the spouting....
Another point is that because the stand is a building, you'll need to check your district scheme or town plan to see how far you need to be from the nearest boundary.
Whew, let's move on.
Dimensions
What does it look like?
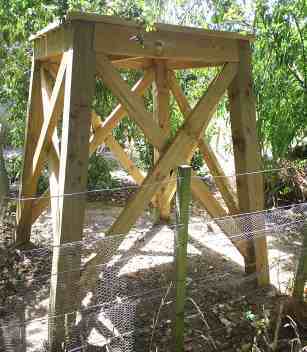
I've tucked this one in amongst the drought stricken Tarata trees so the view from the vege garden beyond will be discrete.
There's no reason why it couldn't be painted if the cash avails itself (Multiversal smells great). Alternatively you can prove Frank Lloyd Wright correct by planting a creeper at the base of one of the legs.
Materials
The posts are 125x125 H5 (ground retention: if you want to avoid the copper then go for concrete piles and build up off a timber plate).
The beams are 200x50 H3, the braces are 100x50 H3 and the deck is 150x32 H3 (which would have been better as 200x32 H3). The 32 thickness is available from farm suppliers (Goldpine) as stockyard timber.
Photo time!
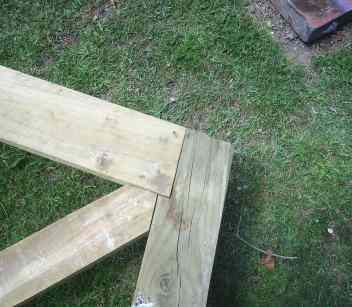
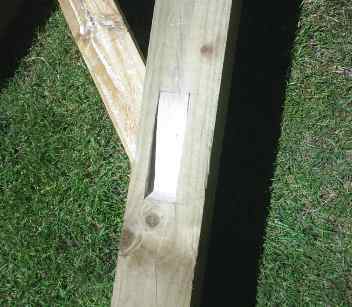
The top beam is rebated in, and the brace just butted. Both are nailed of course: I used 100mm galv flatheads.
You'll notice the checking (surface splits) in the posts: the drying of these needs to be slowed right down so buy them in winter or at least keep them shaded.
The top joint could have been deeper, so you'll see that change in the drawing at the end. The rebate is important, as nailing is only good for holding the joint but not for carrying the weight of water.
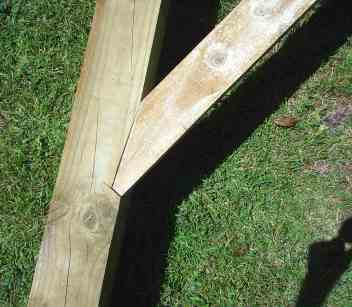
And the other end of things. You can see this is a compression structure!
The photo below shows the end cut at right angles. I usually saw the end of the brace square and then lay it over the post to set out the angle.
All pretty basic stuff really, but if it's new to you then the way to learn is by doing!
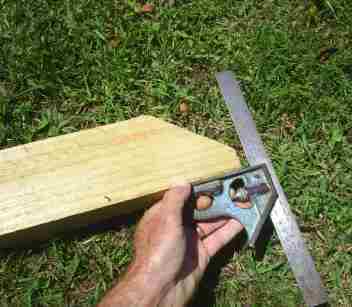
These cuts have all been made with a handsaw, and rebates with a chisel. There's no need to splash out on the latest power tools, just simple hand tools are quite adequate. If you haven't got or can't buy decent tools then try the second hand dealers as there may be some good, if somewhat drab and dusty, tools there.
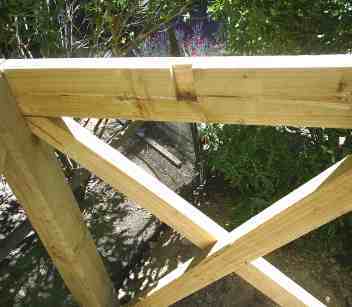
The next photo is the rebate for the inner brace. I rebated top and bottom for this, but on hindsight it's probably easier to double up the beams so we get butts at the top and rebates at the bottom only, and the cost of the extra timber is quite small.
If the braces don't quite fit, a little can be planed off the end or, if too loose, a wedge can be tapped into the gap (wedges can apply a lot of force, so go gently).
This is how it looks so far:
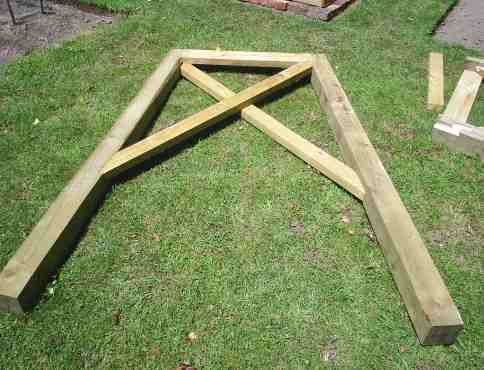
By now you should have the general idea. I made two frames and prefabricated the rest so I could stand the two frames up into their holes and then add in the remaining beams and braces.
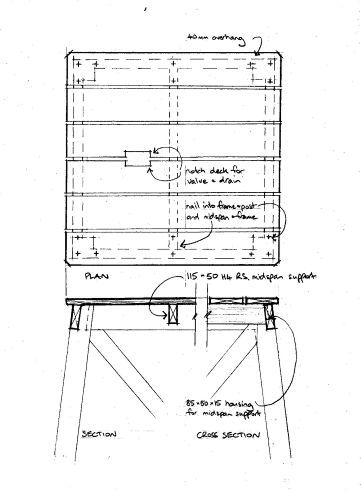
With a perimeter frame to support the deck, the decking would be what is known as "simply supported," which means the decking will sag. I added an intermediate support beam, housed as shown below:

It helps to fit this intermediate support during assembly rather than after the side beams are on, because the sides are tapered. The end result should look like:

I see a bird has left it's calling card already.
What may not be so obvious is that all the beams, including this one, are "bow up." This refers to springing a board to find the way in which it is strongest: support one end and sight along from the other while holding it on edge. Turn it over. The way with the least or no sag is bow up.
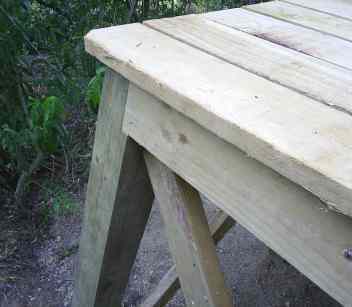
Last photo: this time with the deck in place. Leave gaps between the deck boards so there is some chance of the deck breathing.
I'm nearly up to 30KB with this page so rather than add the drawings here I'll put them in a new page called Tank stand plans.
Some time later...............
Stephen G. Butcher (Updated 20/02/08)
(Drawings added 14/01/12)
(Updated 28/03/12)
Well, it has been a while! Finally, I have drawn up some plans. There are some differences: I've called up H4 rather than H3.2 for the deck platform (either will do) and I've called up 200 x 30 boards for the deck for easier nailing of the corners.
I've uploaded a pdf version of the drawings, which you can find here. If you do use them and they turn out to be useful, may I suggest a small donation? There is a link to my homepage below.
Feedback is welcome, as always.
Since loading up the plans and receiving feedback (always appreciated!), I've dug up some photos showing the completed tankstand, with the tank in place, and some of the steps along the way.
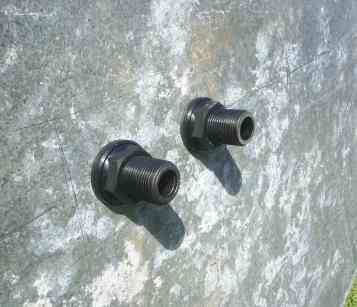
The first step was the fabrication of two outlets in the bottom of the tank.
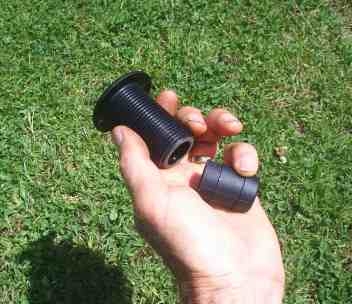
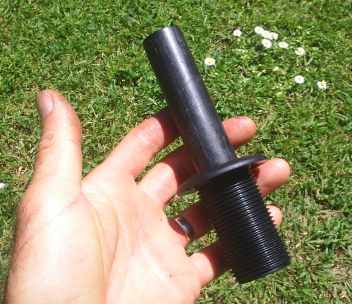
Here I've cut the end off a tank outlet because, rather than connecting alkathene pipe to it, I'm intending to thread on a 25mm ball valve.
I'm using two, both cut this way, so that I have one for the outlet valve and one on which to screw a plain cap as a drain. This latter allows me to clear out sediment and debris, but the main outlet has to be raised a little so it doesn't pull sediment into the outlet pipe.
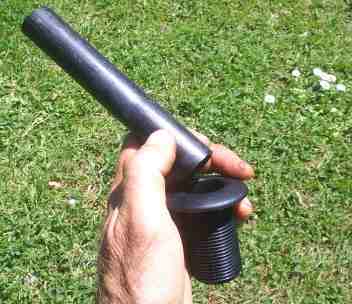
The way I achieved this was by cutting a length of alkathene pipe to be a firm push fit inside the outlet nipple:
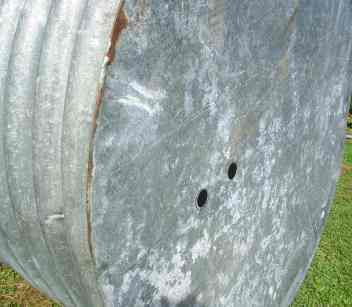
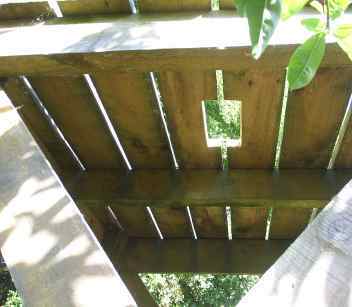
Next came the cutting of the holes in the tank which line up with the rebate in the decking. I did it the hard way with a drill to make a circle of small holes followed by a rat's tail file to clean up. Even so, it didn't take too long.
Now, all being well, the outlet connectors will go through the rebate when the tank is put in position....
The moment of truth is much easier with some help. Even a fairly lightweight galvanised iron tank can be a bit of a handful, especially with the bits poking out the bottom.
It can be useful to clamp some boards to the deck to prop the tank off. Once everything looks to be in the right place then the boards can easily be removed.
Now, an empty tank can blow away...
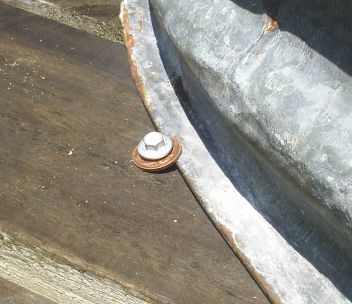
So, here I have used a short Tek screw: four in all around the tank. The washer used to get a good grip on the tank flange is a coin. Which is nice; money actually doing something useful and, as a bonus, in a rather difficult position to be pinched.
If the tank you have chosen is molded then you'll be relying on the weight of water below the outlet extension pipe, or some cunning plan, to hold the tank in place.
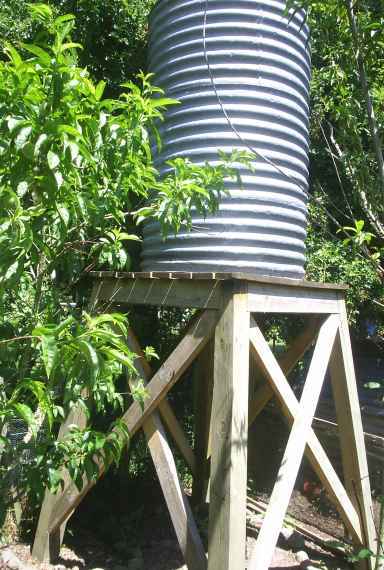
So here we have the finished tank. It's quite tall, a tank and a half height I think, but still well within the ability of the stand to support it:
Now, there's job satisfaction!
I put a coat of creosote on the deck, even though it is treated timber, as this is the area most vulnerable to decay.